This guide explains the purpose and material changes behind 18 common stamping terms. They are a glossary, not 18 mandatory steps in one production route. Shearing and forming are families of operations; workshop terms such as flattening and push-back need a drawing or section view to remove ambiguity.
Read each illustration from left to right: starting shape, then result. Blue identifies retained metal, gray identifies detached scrap where present, and orange highlights the changed region. Numbered panels match the numbered explanations. The images are original AI-generated educational schematics, not factory photographs, die designs, scale drawings or simulated stress results.
01–03 · Blanking, Piercing and Lancing
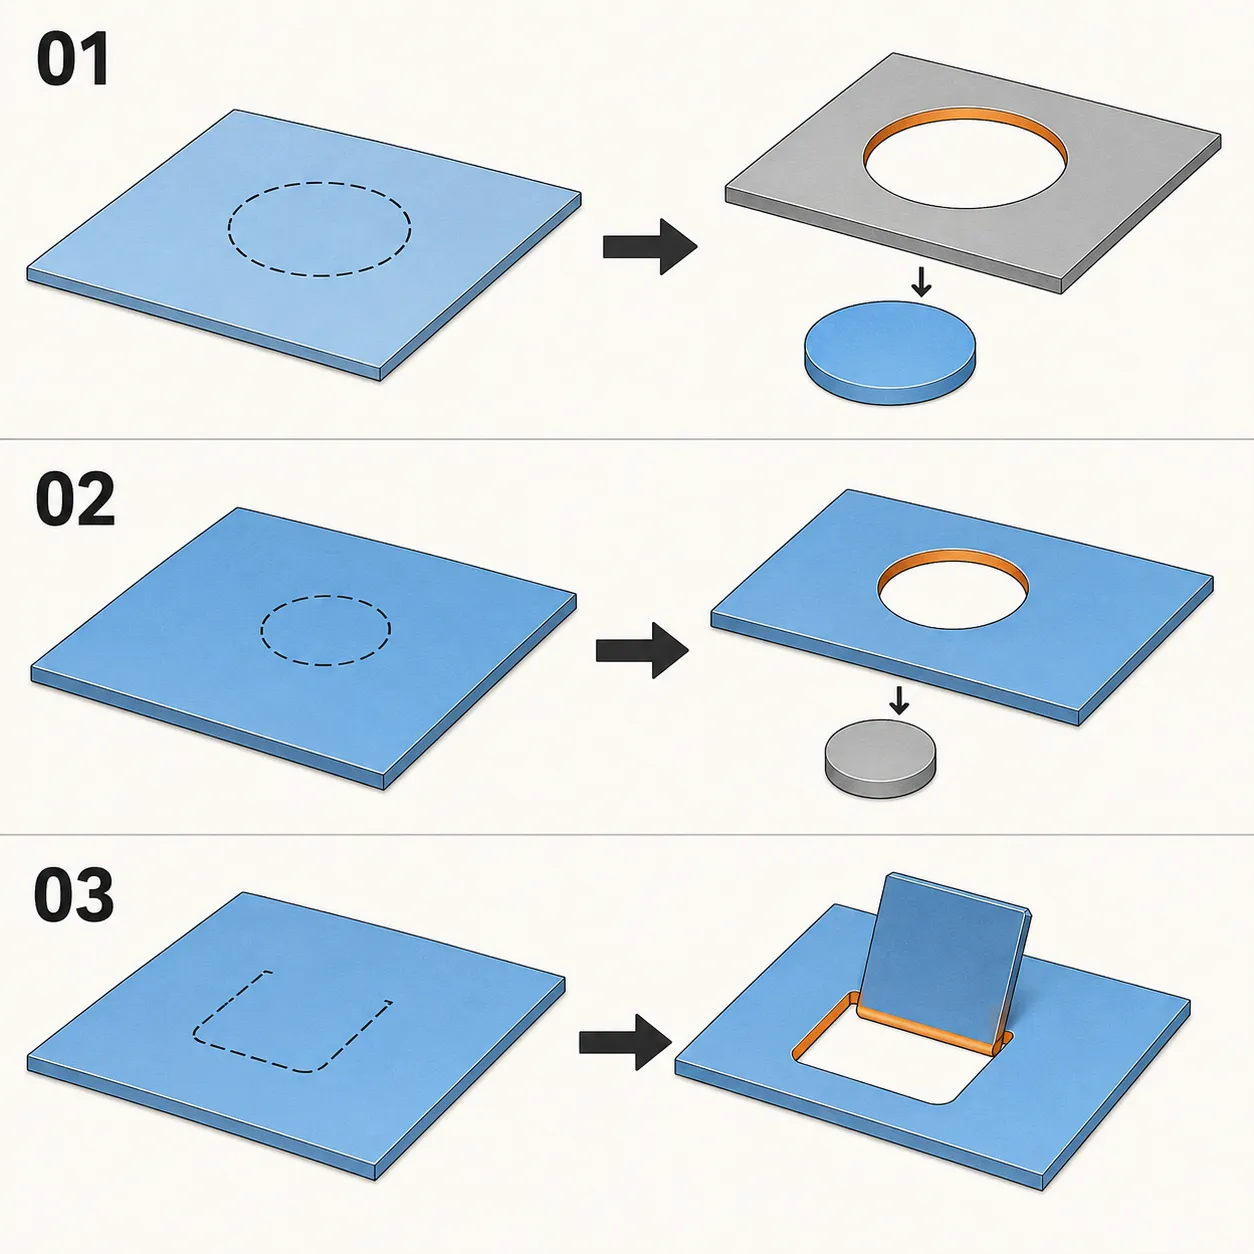
01 · Blanking: keep the piece cut from the sheet
Blanking cuts a closed outline to produce a flat blank for a finished part or a later forming operation. The separated piece is the useful blank; the surrounding strip is usually scrap.
The cutting zone first deforms and then fractures in shear. Its edge can contain rollover, a burnished zone, a fracture zone and a burr. Local work hardening and distortion are possible even when the blank remains broadly flat. Specify the functional outline and acceptable burr direction.
02 · Piercing: keep the sheet around the hole
Piercing creates holes or slots for mounting, ventilation, alignment or a later operation. Here the surrounding sheet is the product and the removed slug is scrap—the reverse of the useful-piece choice in blanking.
Shear deformation and fracture create the hole wall and its exit burr. A nearby free edge or narrow bridge can distort, so hole diameter, position, edge distance and burr side all matter. A pierced wall is not automatically perfectly cylindrical or burr-free.
03 · Lancing: cut a tongue while keeping its root attached
Lancing makes a partial cut; a forming action often raises the attached tongue into a tab, louver or clip. The illustrated version cuts three sides and bends the fourth, leaving no separate slug.
The cut sides undergo shear separation, while the root bends plastically. The root's outer surface stretches and its inner surface compresses. Cut-end radii, root width, grain direction and final angle affect cracking and springback; a raised tab alone does not establish spring performance.
04–06 · Cutoff, Trimming and Shearing
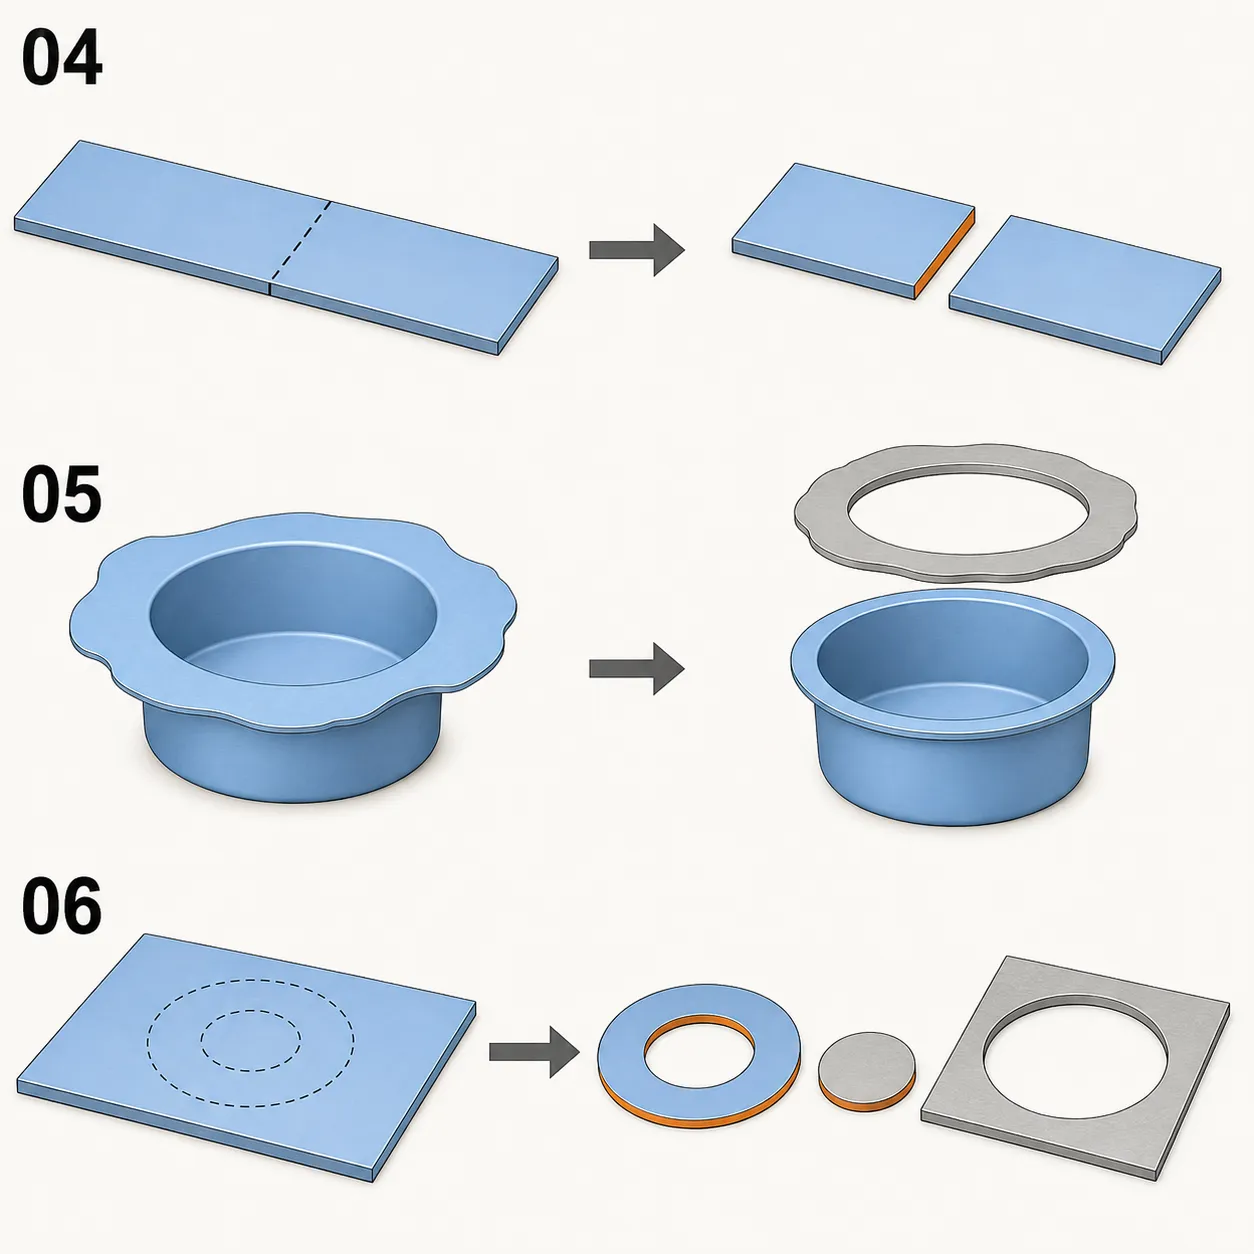
04 · Cutoff: divide strip or separate a finished part
Cutoff separates a length from strip or releases a formed part from its carrier. In an ideal common-line cutoff, the two useful pieces share one cutting boundary, so no intermediate strip of scrap is required.
The boundary deforms and fractures in shear. End burrs, bow or twist can still develop. Some actual layouts use a scrap bridge or double cut, so the term cutoff does not guarantee zero scrap; the strip layout determines that.
05 · Trimming: remove excess material after forming
Trimming cuts a formed part's excess rim or flange to its required boundary. A drawn cup, for example, may need trimming after drawing leaves an uneven rim.
Excess metal separates at the cut edge; the useful shell stays formed. The new edge can have a burr, and releasing residual stress can shift the shape slightly. The part must be located and supported correctly to control trim height, edge quality and distortion.
06 · Shearing: a family name for material separation
The Chinese term 冲裁 covers die-cutting operations that separate sheet, including blanking and piercing. It is an umbrella term, rather than a separate shape that must follow the other cutting operations.
Material near the cutting edges passes through elastic deformation, plastic shear and fracture. Different operations select different retained regions. The washer illustration shows an outer blanking boundary and an inner pierced boundary; actual tooling may combine them or split them across stations.
07–09 · Bending, Flattening and Forming
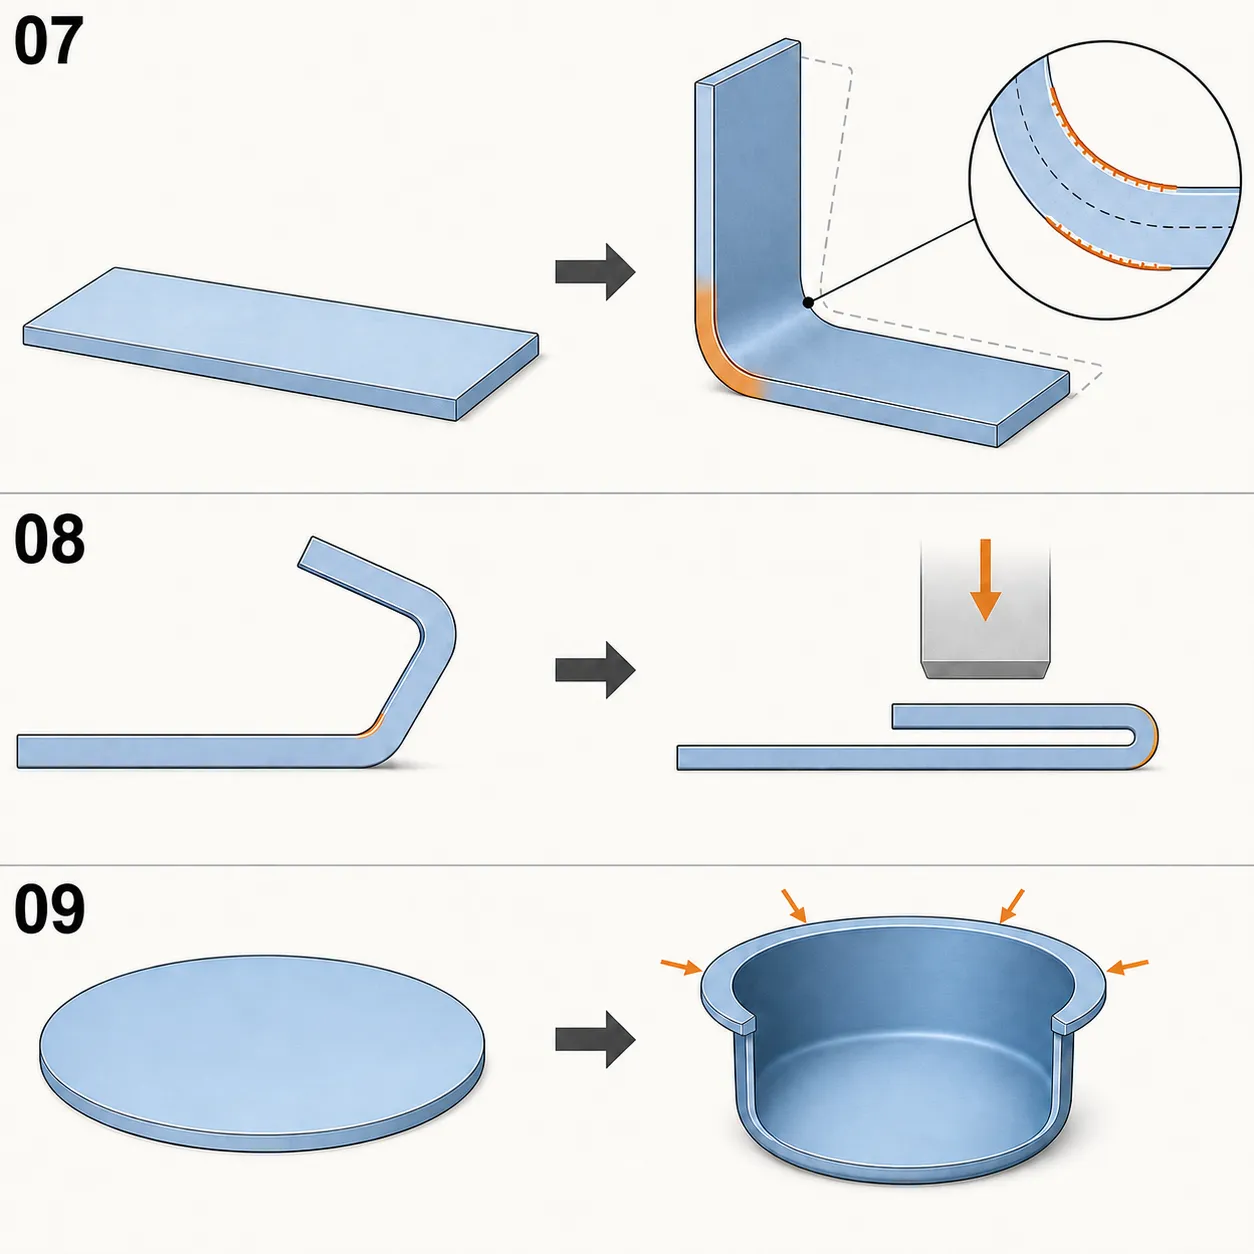
07 · Bending: stretch the outside and compress the inside
Bending turns flat sheet into an angle, channel or curved section without intentionally separating it. Around the bend, outer fibers lengthen, inner fibers shorten and a neutral region lies between them.
A lasting bend requires plastic deformation. The elastic portion recovers after unloading and produces springback. Bend radius, angle and nearby holes may change; tight radii can increase thinning or cracking risk. The neutral axis is not always at mid-thickness.
08 · Flattening: define whether the job is hemming or leveling
In the illustration, flattening means pressing a pre-bent edge down into a closed hem. It can cover a cut edge or create a folded rim. In other shops the same word may mean correcting the flatness of an entire panel, which is a different task.
In the illustrated hem, the return flange rotates toward the parent sheet and its bend region deforms further. Two metal layers remain; they do not become a single sheet of the original thickness. Material, bend nose, gap and surface condition affect cracking, marking and coating damage.
09 · Forming: a family name, with drawing as one example
Forming covers operations that create geometry through plastic flow without intentionally separating the workpiece. Drawing is one example: a punch draws a flat blank into a hollow cup while surrounding flange material feeds inward.
During drawing, the flange experiences radial tension and circumferential compression; it can thicken locally or wrinkle if insufficiently controlled. Walls and radii can thin under tension. Drawing is not simply stretching a fixed patch thinner: blank-holder action, friction and draw-in all affect the result.
10–12 · Half-shearing, Crease Coining and Burr Flattening
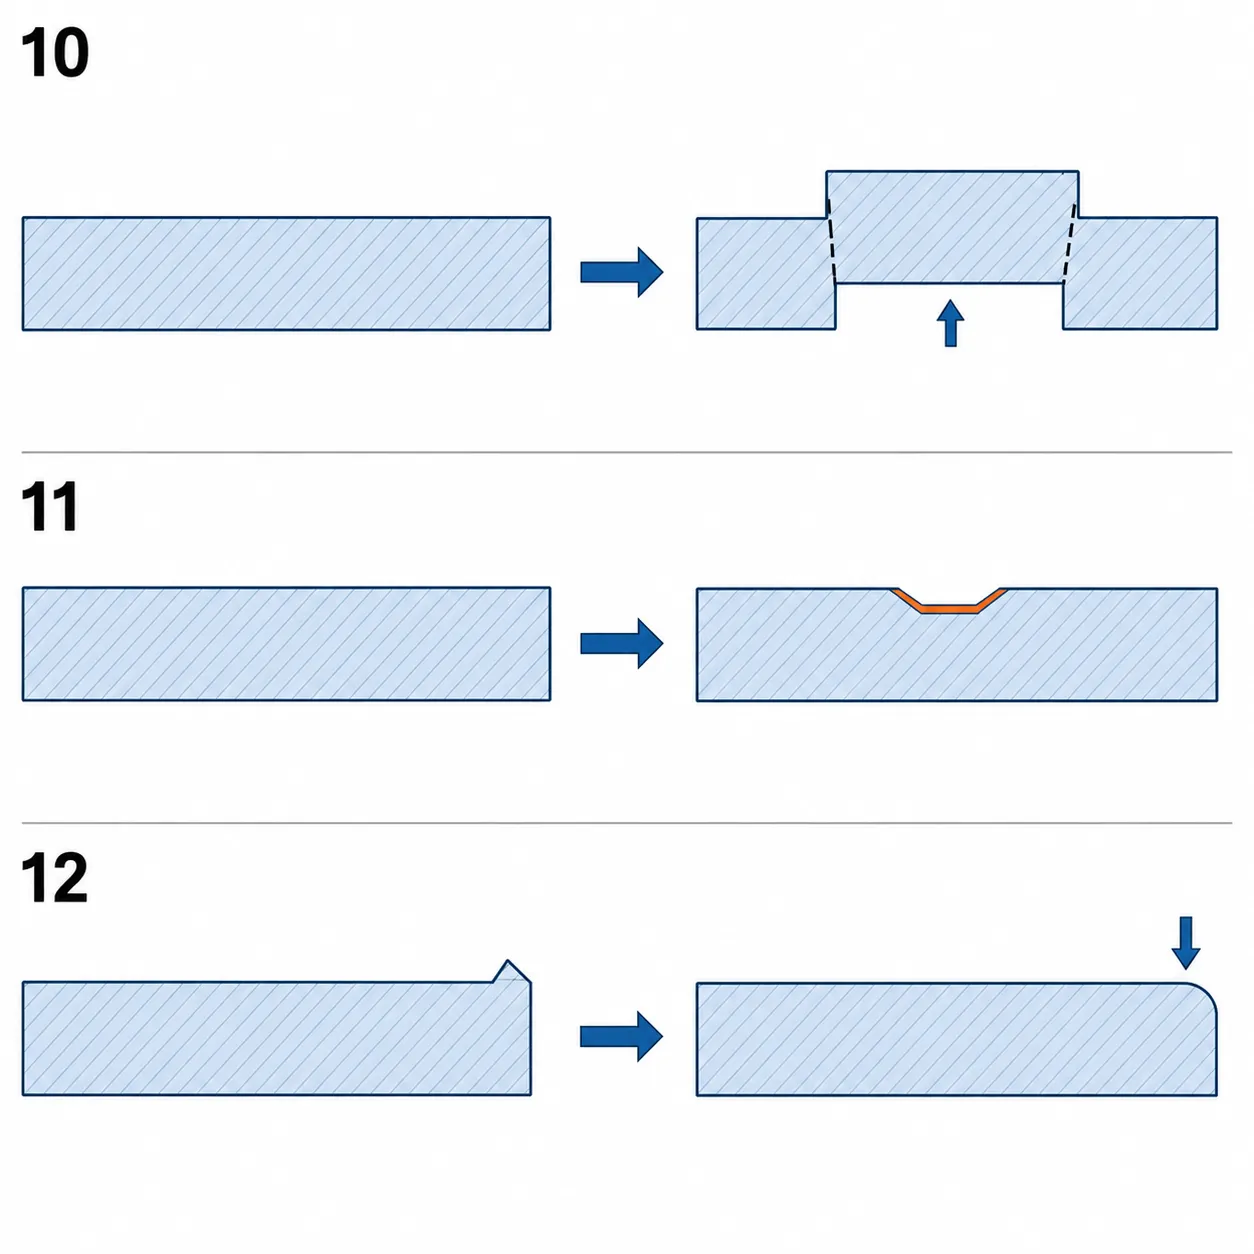
10 · Half-shearing: offset material without fully detaching it
Half-shearing, also called partial shearing or half-blanking, offsets a local island while keeping part of its thickness connected. It may provide a locating feature or an intermediate feature for later work.
Part of the boundary shears and the remaining ligament holds the island to the sheet. The step height, remaining connection and shear damage depend on penetration and tooling. Half does not specify exactly 50% of thickness; a section view and required height must define the feature.
11 · Crease coining: press a controlled groove
Crease coining presses a line or narrow groove into the sheet. Depending on the design, it can define a later bend position or make a locating feature. Its meaning should be confirmed with a groove profile.
Contact pressure plastically displaces metal and can reduce the remaining thickness locally. A deeper groove can become a stress concentration or a crack origin. Specify its depth, profile and function; an ordinary crease is not automatically a qualified breakaway score or fatigue-resistant hinge.
12 · Burr flattening: displace the burr instead of cutting it away
Burr flattening uses a pressing or edge-coining operation to lower a burr left by cutting. It can improve a contact edge when the required geometry permits this route.
The projecting metal is compressed and displaced; it has not necessarily been removed. A folded burr, sharp remnant or local crack can remain. Acceptability therefore depends on an edge specification and inspection, not on the instruction press the burr alone.
13–15 · Hole Flanging, Embossing and Riveting
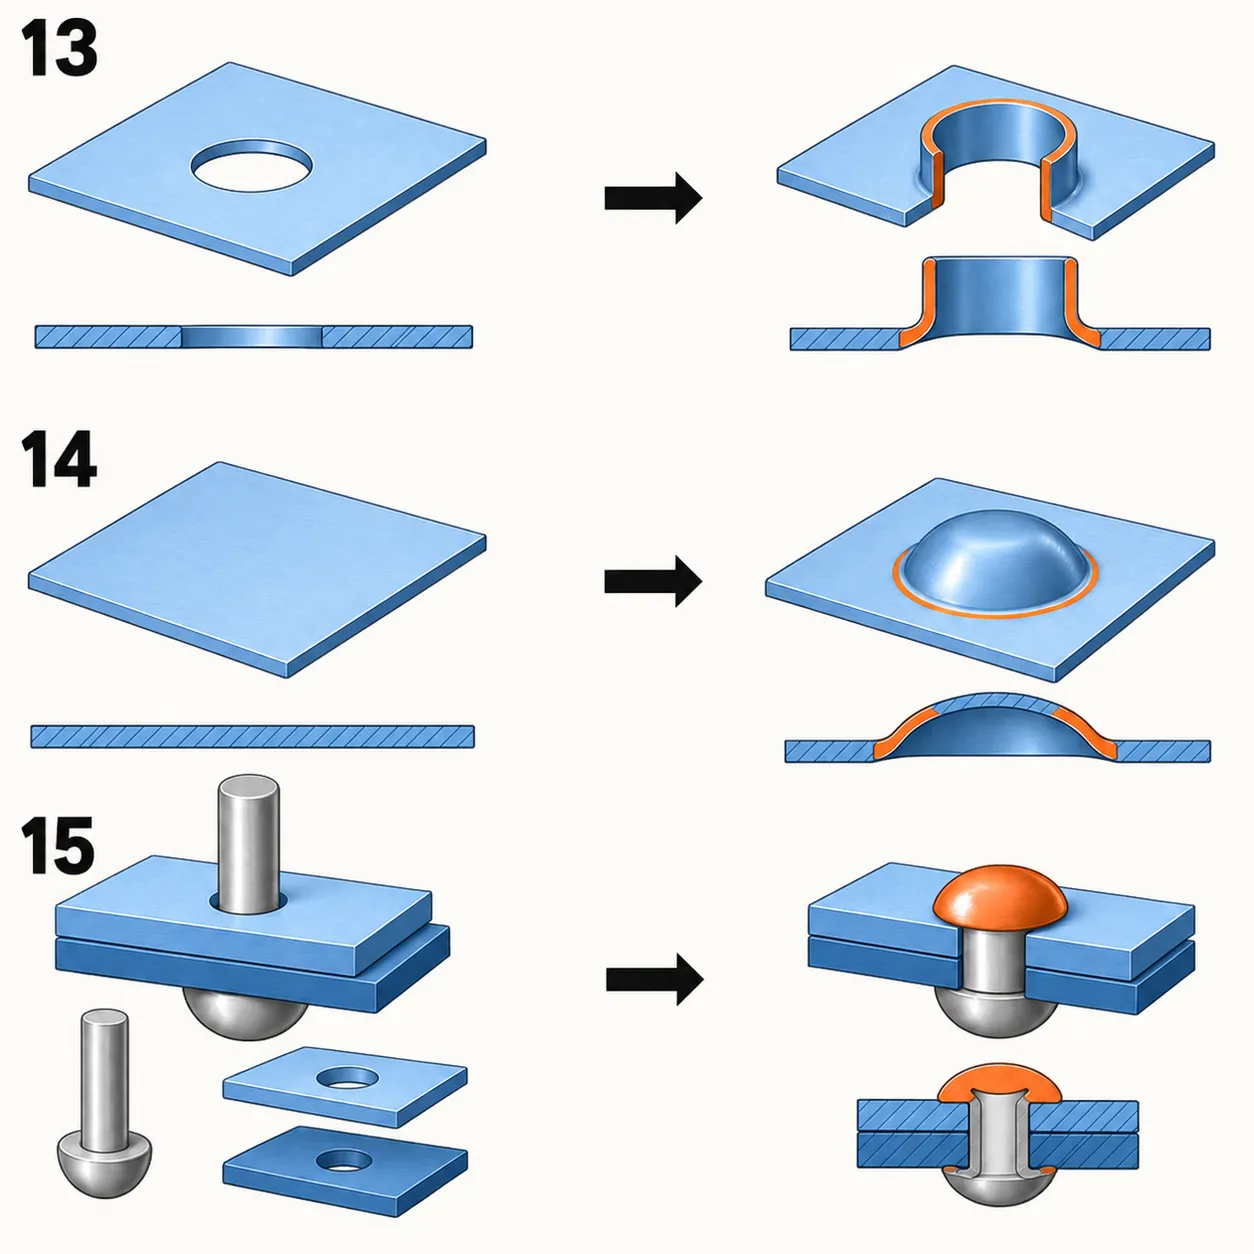
13 · Hole flanging: raise the hole edge into a collar
Hole flanging, sometimes called hole extrusion or 抽芽/抽牙 in workshops, raises a pierced hole's edge into a short collar. It can provide a locating surface or additional engagement height for a separately specified threading operation.
In a stretch-flanged hole, the circumference expands and the edge commonly thins. The sheared pilot-hole condition matters because existing edge damage can open into splits. A raised collar does not already contain a thread; final hole size, height, wall and any tapping must be defined.
14 · Embossing: raise a closed local feature
Embossing makes a raised or recessed local shape, such as a dome, bead or locating feature. The illustrated dome is formed from intact sheet, with a corresponding concavity on its underside.
The sheet bends and may stretch while neighboring material feeds into the feature. Local thinning, work hardening and surrounding distortion are possible. A raised bead can increase geometric stiffness without proving higher material strength; height, radii and appearance need their own requirements.
15 · Riveting: deform a joining element to hold parts together
Riveting joins parts by plastically forming a rivet or an integral joining feature. In the illustrated solid-rivet example, a protruding shank is upset into a second head that retains the overlapping sheets.
The rivet end shortens and expands sideways; the sheets may also indent or dish if poorly supported. This is different from welding and does not make every press-installed fastener a rivet. Specify the joining method, stack thickness, head geometry and required joint checks.
16–18 · Imprinting, Restriking and Push-back
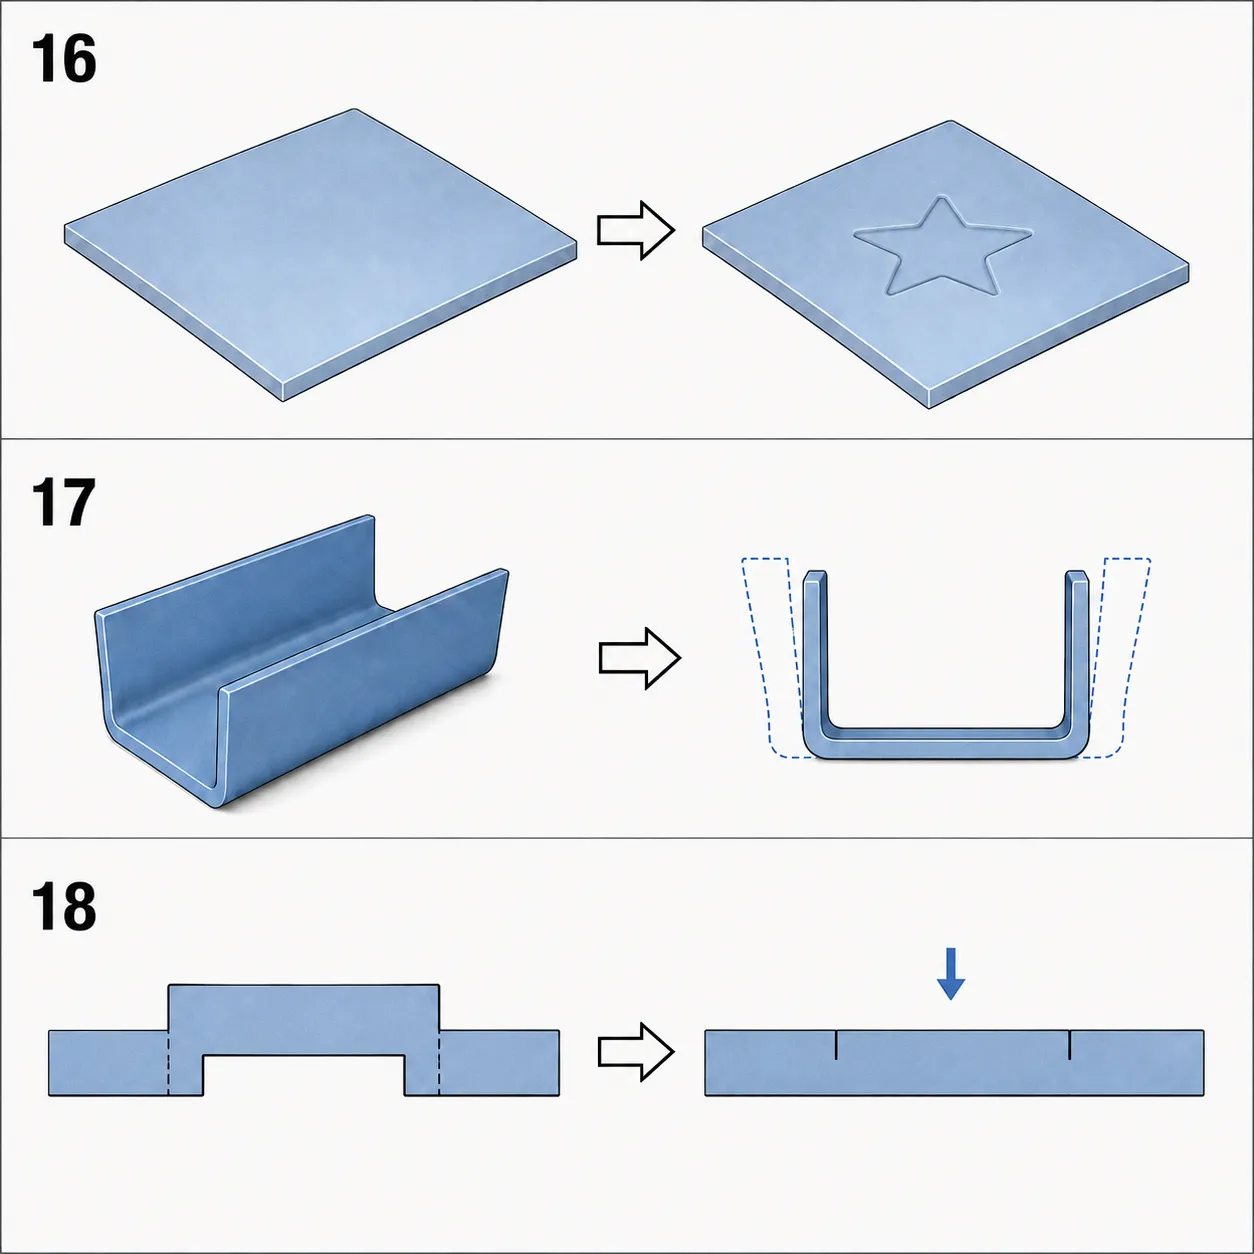
16 · Imprinting: form a mark by local pressure
Imprinting or mark coining presses lettering, a symbol or a shallow pattern into metal. The mark is created by contact pressure, rather than by adding ink or removing metal with a cutter.
The contact region deforms plastically and material moves locally. A supported shallow impression may leave the opposite surface nearly flat, but this is not guaranteed for every depth, thickness or tool. Specify mark depth, legibility and allowable backside witness.
17 · Restriking: correct an already formed part
Restriking or sizing uses a later tool contact to adjust an existing shape, for example an angle, radius, wall position or local flatness after an earlier forming operation.
Small additional plastic deformation can improve dimensional agreement with the drawing and compensate for expected springback. New residual stresses and some later springback can still remain. Define the inspected condition and datums; in-die fit alone does not prove the free part is correct.
18 · Push-back: confirm the shop-specific meaning
The workshop term 回压 is not one universally defined die operation. It may describe pressing a protruding feature back toward a target position or a reverse correction step. Here it is illustrated by pushing a partially sheared island approximately flush with its parent sheet.
The metal moves back, but its deformation history and partial shear boundary remain. Reverse loading can redistribute stress; it does not guarantee stress elimination, crack healing or restoration of the original material. Specify the before-and-after section and the required function instead of relying on the term alone.
What changes in the material beyond the visible shape?
In ordinary cold forming, plastic flow approximately conserves metal volume. If a region gains surface area without enough material feeding into it, it tends to thin; compression can instead cause local thickening or wrinkling. Thickness is therefore not uniformly unchanged across a formed part.
Cold work often raises strength and hardness while reducing remaining ductility, to a degree that depends on grade and condition. Unloading leaves elastic recovery and a residual-stress pattern. These are separate from heat-treatment effects, and none can be quantified from an illustration alone.
Start with what you have
Share an existing drawing, photo or sketch with HARVLAND, or simply describe how the part will be used and what you want it to do. You are welcome to get in touch while material or process choices are still open.
We can review manufacturability with you, discuss material and forming options, and identify any features that may need adjustment. From there, we can work through the details needed for a quotation and production.