For a formed cover, mounting bracket or equipment panel, the useful first question is where the rust begins. Marks across an exposed face, inside a fastener joint and beside a weld lead to different checks. Investigate those clues before making a blanket decision to replace the alloy.
Why corrosion resistance depends on the surface and environment
Stainless steel is an alloy, not ordinary steel made rustproof by a clear coating. Its chromium supports a thin passive surface film. When a clean surface is exposed to suitable oxidizing conditions, the film can reform after local damage. Chlorides, acidity, temperature and restricted conditions can interfere with protection; corrosion resistance therefore depends on the alloy, surface condition and actual service environment together. [1]
Salt deposits, retained dirt and inadequate washing deserve particular attention on exposed parts. Coastal tea staining is a form of surface discoloration associated with corrosion, but every brown mark is not automatically tea staining. A broad stain and a small deep pit can look deceptively similar in a photograph. Check the metal beneath the deposit and the function of the part before judging the severity. [2][4]
Start with the location: four patterns to investigate
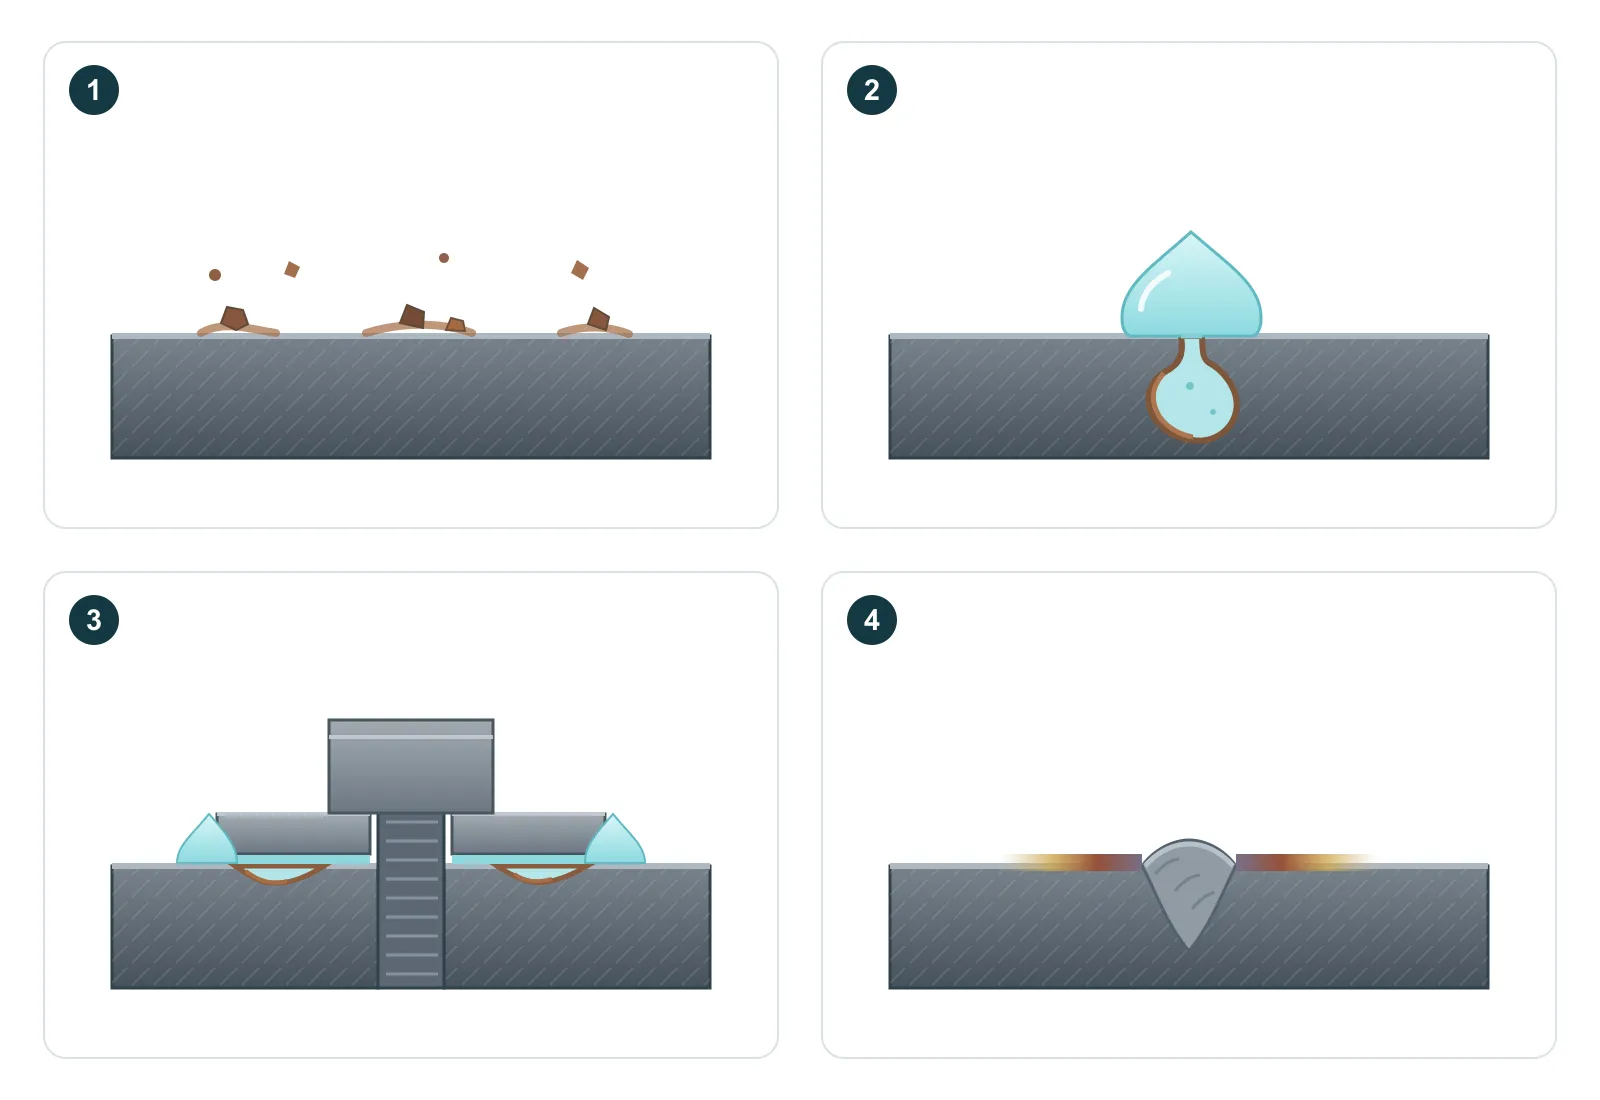
The patterns below guide an inspection; several mechanisms may coexist on the same part. Preserve photographs and the exposure history before cleaning. Record whether the marks appeared during storage, after installation, after nearby grinding or after a cleaning change.
| Observed pattern | Possible explanation | Check before deciding |
|---|---|---|
| Scattered spots on an otherwise exposed face | Deposited iron particles, salt or other surface contamination [2][4] | Nearby carbon-steel grinding, shared tools and storage; inspect beneath the cleaned spots |
| Small cavities or recurring spots below deposits | Localized pitting after passive-film breakdown [1][2] | Actual pit extent, salts or cleaners, wetting history and whether the part's function is affected |
| Marks emerging from a washer, gasket or lap edge | Retained liquid and an aggressive crevice environment [6] | Surface beneath the joint, trapped deposits, drainage and cleaning access |
| Discoloration or attack concentrated beside a weld | Heat oxide, an affected surface layer or contamination [3] | Required weld-cleanup condition, access to both sides and the treatment record |
Foreign iron can rust on stainless without proving a wrong alloy
Carbon-steel grinding dust, a shared wire brush, contaminated abrasives or handling equipment can transfer iron to a stainless surface. Those particles can rust when wet, producing orange-brown marks even though the part is stainless. Some contamination is embedded, so wiping away the visible deposit may leave its source behind. [2]
Check the route that brought the particles onto the part, then choose a removal method suitable for its alloy, finish and function. After treatment, inspect whether the base surface is intact or contains pits. Removing iron contamination does not fill a pit that has already formed; a bright-looking face is not enough evidence of restored dimensional or functional condition. [2]
- Keep stainless handling and finishing tools free from carbon-steel contamination.
- Separate finished stainless parts from nearby steel cutting and grinding dust.
- Review abrasives, brushes, fixtures, transport supports and storage as possible transfer points.
Pits and sheltered joints need more than stain removal
Pitting is localized loss of metal. Chloride-containing moisture can attack a susceptible surface, and retained deposits can concentrate exposure during wetting and drying. A small visible opening may conceal a deeper cavity; the stain area is therefore a poor substitute for inspecting pit depth and remaining material where they matter. The same alloy can behave differently when salt, temperature, surface preparation or washing changes. [1][2][4]
Under a washer, gasket or lap, liquid may enter while circulation remains limited. Oxygen can be depleted and the retained liquid can become more acidic and enriched in chlorides, making conditions more aggressive than on the nearby open face. This is crevice corrosion; it can occur in an all-stainless assembly. An insulating washer does not by itself eliminate the wet crevice. Review the joint and its cleaning or drainage conditions, using the welded-sheet guide for design detail. [6]
Cleaning, pickling and passivation solve different problems
Start by identifying what needs to be removed. Oil and grease need suitable cleaning before an acid surface treatment. Weld heat tint is an oxide formed at high temperature; the metal immediately beneath it can be depleted in chromium. Removing superficial color alone does not establish that the required corrosion-resistant surface has been restored. [3]
Chemical passivation is a controlled treatment of a prepared stainless surface to remove suitable contaminants and support its passive condition. It should not be treated as a substitute for removing unsuitable weld oxide and the affected layer. Select a qualified treatment route with the part's alloy, finish, dimensions, joint access and rinse requirements in view. Pickling removes metal and can change appearance; these are consequences to evaluate before treating a cosmetic face or close fit. [3][5]
| Operation | Main purpose | What it does not establish |
|---|---|---|
| Cleaning / degreasing | Remove oils, grease, dirt and removable deposits using a compatible method [3] | Removal of embedded iron, all weld oxide or existing pits |
| Pickling / specified oxide-removal route | Remove high-temperature oxide and the adjacent chromium-depleted layer; review metal removal and appearance [3] | Repair of a pit, retained wall thickness or automatic approval of a close fit |
| Chemical passivation | Remove suitable surface contaminants, including free iron under an applicable treatment, and promote the passive condition [3][5] | A replacement for necessary descaling, proof of all-service corrosion immunity or a service-life guarantee |
A practical inspection sequence for a stained part
Use an agreed inspection sequence so that cleaning does not erase the evidence you need. The method and access should suit the part; disassembly or rework must preserve the surfaces and dimensions that control its function.
- Photograph the marks with a scale, identify the part and lot, and mark each location on a drawing or sketch.
- Record the specified material, storage and service conditions, salt exposure, cleaning products and when the marks first appeared.
- Have the responsible person select a compatible cleaning method; keep contaminated steel brushes and abrasives away from the surface.
- Inspect the cleaned area and, where relevant, beneath joints and on the reverse side. Separate discoloration, residual deposits and actual cavities.
- Where cavities matter to strength, sealing or fit, assess their extent and remaining material with a suitable measurement method before approving rework or reuse.
- Record the treatment, inspection result and accepted condition, then check whether marks recur after the agreed exposure or maintenance interval.
Teaching example: a panel develops scattered brown spots after nearby carbon-steel grinding, while one washer edge also shows a rust line. The spots justify a contamination investigation; the washer edge requires a separate look beneath the joint. If pits remain after cleaning, changing the cleaning schedule alone cannot restore the lost metal. The location narrows the questions, but inspection confirms the condition. [2][6]
Reduce recurrence by changing the cause you actually found
For transferred iron, control tools, handling and nearby dust. For salt-related staining, review the surface finish, washing access and how deposits collect. For a wet joint, review its geometry, sealing or drainage and access for maintenance. For weld-related surface damage, define the required finished surface and confirm the treatment reaches the affected area. Each action targets a different cause. [2][3][4][6]
Review the grade when the actual exposure exceeds the selected alloy's resistance. A more resistant alloy may help, but it does not automatically remove contamination, retained liquid or an unsuitable weld surface. Keep grade comparison in the stainless-grade guide and use the exposure record to make that comparison meaningful. [1][4]
Agree on acceptance before treating the next batch
Define acceptance as a combination of the required appearance, cleanliness, allowed defects and function. A cosmetic panel, a sealing face and a thin load-carrying bracket may need different evidence. If free-iron testing is required, name the applicable method, inspection locations, lot basis and acceptance requirement rather than asking only for a 'passivation certificate'. [5]
ASTM A967/A967M-25 describes chemical passivation treatments and qualitative tests intended to confirm treatment effectiveness, including removal of contaminant iron. A result under one such test does not establish pit depth, remaining strength or long-term performance in every service environment. Application-specific corrosion validation, when required, needs its own exposure and acceptance criteria. [5]
- [1] BSSA — Introduction to corrosion resistance of stainless steels
- [2] BSSA — Iron contamination and rust staining on stainless steel
- [3] ASSDA — Pickling and passivation
- [4] ASSDA — Preventing coastal corrosion (tea staining), Technical FAQ 6
- [5] ASTM A967/A967M-25 — Public abstract and scope
- [6] ASSDA — Crevices and corrosion