This guide helps buyers and engineers working with metal enclosures, brackets and other OEM parts document the symptoms, plan checks and agree on next steps with a coating supplier.
1. Establish what “baked paint” means
“Baked” describes the use of heat, not a complete coating specification. Liquid baking coatings and thermosetting powders have different application and cure requirements. This article concerns films that have already formed; powder falling off before the oven also involves deposition, electrostatics and grounding, and needs a separate investigation. [1][4]
Start with the substrate, coating product, primer/topcoat combination and any rework history. If information is incomplete, check the process sheet and the supplier’s technical data sheet (TDS).
Keep three commonly confused properties separate:
An abrasion-resistant coating may address rubbing damage. Oil, unsuitable pretreatment or poor primer/topcoat bonding still requires its own corrective action. [1]
| Property | What it primarily assesses | Does it alone prove the coating will not peel? |
|---|---|---|
| Adhesion | How readily a coating separates from the substrate or another coat | It describes performance only under the specified method and conditions |
| Hardness | Resistance to a specified indentation or scratching action | No; a hard film can still bond poorly to the layer below |
| Abrasion resistance | Film loss under specified rubbing media and loads | No; wear and interfacial bonding require different checks |
2. Locate the separation before choosing checks
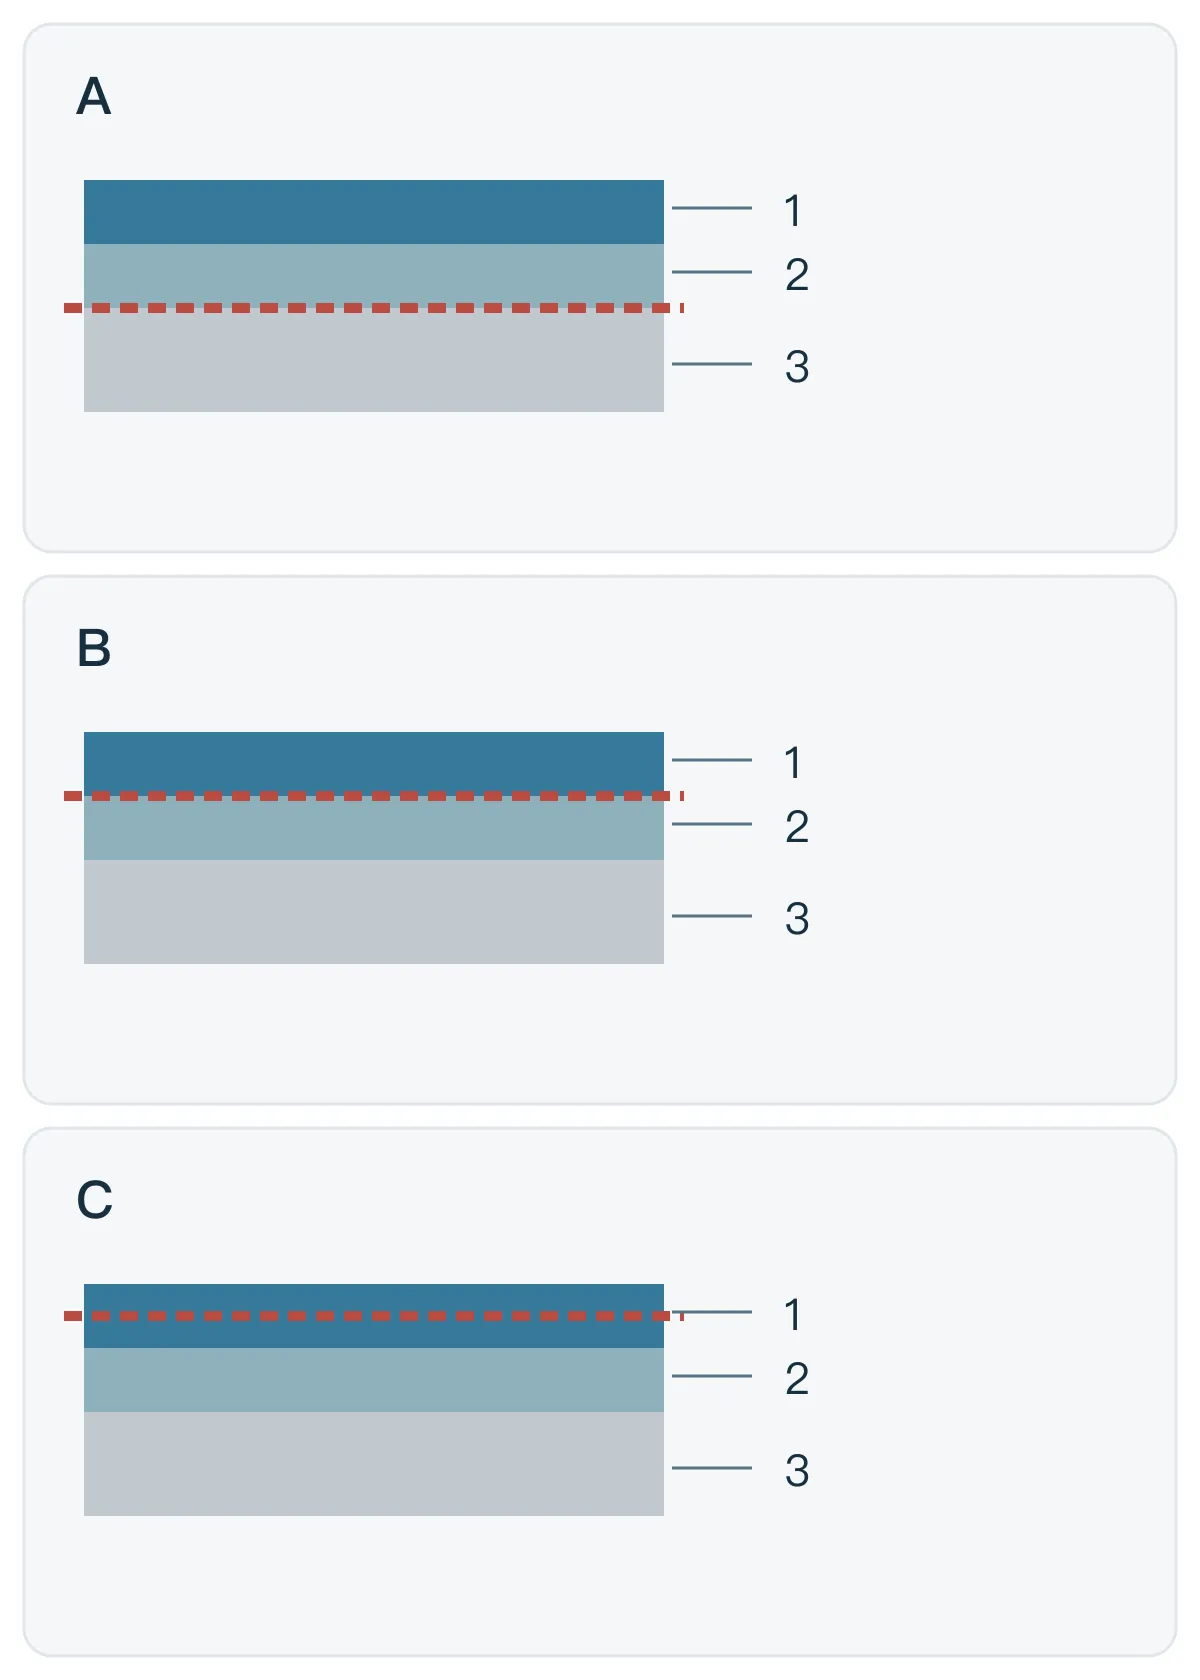
Keep failed parts and apparently sound parts from the same batch. Photograph the damaged area, both faces of detached flakes and the whole part. Record whether the problem appeared after baking, assembly, transport or service before performing destructive checks.
The observations below narrow the investigation. Appearance provides clues; a photograph alone cannot establish responsibility or root cause. In a multilayer system, separation can occur between coats, so the result may not describe the bond between the lowest layer and the metal. [2]
TIGER’s powder-coating troubleshooting guide lists inadequate pretreatment, contamination or corrosion residues, poor intercoat adhesion, cure deviations and mechanical action separately. Symptoms need to be read alongside process records. [1]
| Observation | Check first | How to investigate further |
|---|---|---|
| Sheets of coating detach and apparently expose metal | Substrate cleanliness, oxides, pretreatment and coating suitability | Establish whether the exposed surface is metal, conversion coating or primer; compare surfaces and process records with sound parts |
| Topcoat detaches while primer remains | Intercoat contamination, compatibility and recoating conditions | Check both products, application interval and preparation requirements; make specimens with the same combination |
| Film cracks or chips, leaving coating on both fracture faces | Film strength, flexibility, cure, thickness and applied stress | Examine crack location, thickness and cure records; reproduce the agreed assembly or mechanical action |
| Chipping concentrates on cut edges, holes, bends or screws | Edge oxides, burrs, coverage and assembly pressure | Compare parts before and after assembly; check edge treatment, hole fit and contact points |
| Blisters follow moisture exposure, with rust or other corrosion beneath breaks | Residual salts or cleaners, moisture, film defects and service exposure | Check rinsing, drying, water traps, substrate and corrosion; not all blistering has the same cause |
3. Check five stages in process order
1. Cleaning: no visible oil does not establish a paint-ready surface
Stamping and drawing lubricants, rust preventives, fingerprints, welding anti-spatter products and oil in compressed air can affect coating formation. Wiping a surface until it shines does not demonstrate that the selected coating’s cleaning requirements are met. [1]
Identify the contamination actually entering the line and whether cleaning removes it from holes, folded edges and recesses as well as flat areas. Include handling and storage after cleaning to prevent renewed contamination.
In a suitable cleaning process, rinse water beading instead of wetting continuously is a reason to investigate. This observation does not prove that all salts and residues have been removed, nor replace final adhesion acceptance. [1]
2. Substrate and pretreatment: steel, galvanized steel and aluminum differ
Pretreatment must suit the substrate, coating and service requirements. Rust and scale on steel, the condition of galvanized surfaces, and degreasing and conversion treatment on aluminum require different attention. Where a conversion coating is required, check continuity, excessive thickness or friability, and subsequent rinsing and drying. [1]
Pay attention to cut edges and weld areas. For example, oxide formed during oxygen-assisted laser cutting may affect powder adhesion; TIGER identifies it as a chipping cause. This condition should not be generalized to every laser-cut edge. [1]
Before sanding or blasting, define what must be removed and the acceptable resulting surface. Roughening does not replace degreasing and must not damage plating, dimensions or mating surfaces. Choose the method according to substrate and coating requirements.
3. Cure: check the part’s temperature history
An oven reaching its setpoint does not mean every part location has reached that temperature. Thickness, thermal mass, oven loading and hanging position affect heat-up. TIGER recommends measuring the actual part temperature profile when needed and comparing it with the product data sheet. [1]
When the TDS specifies cure at part temperature, check the effective time after the part reaches the required temperature; total oven residence is not automatically curing time. Include representative thin, thick and slow-heating locations rather than measuring only oven air.
Undercure and severe overbaking can both impair the mechanical properties of thermosetting powder films. Check the actual profile, permitted cure window and film thickness before adjusting the process. “Bake longer” is not a universal remedy. [1]
For liquid baking coatings, separately check application, flash-off and baking requirements in the relevant TDS; confirm mixing ratios for multicomponent systems. Do not copy a powder product’s parameters.
4. Compatibility and thickness: thicker does not always mean more reliable
A satisfactory primer and topcoat are not automatically a suitable combination. Applying fresh paint over old film, powder over a liquid primer or another coat during rework requires checking intercoat adhesion and baking compatibility. [1]
Record each product, application sequence and supplier’s recoating requirements. Where sanding is required, define its extent, dust removal and subsequent cleaning. Matching colors does not demonstrate coating compatibility.
Control thickness for the selected system. Excessive thickness can change mechanical performance; buildup at corners or recesses may introduce other defects. Measure the agreed locations rather than treating one flat-area reading as representative of the whole part. A product-specific thickness recommendation is not a universal limit for baked coatings. [1]
5. Assembly and service: find the first operation that causes damage
If parts look sound after baking but chip when screws or clips are fitted, check contact pressure, clearance and edges. If failures appear only after damp service, investigate moisture, residues, corrosion and system suitability together. [1]
Keep inspection records after coating, assembly and packing to distinguish existing defects from later damage. Mechanical damage still warrants checking coating quality: it neither automatically fails the entire batch for adhesion nor rules out a coating problem.
4. Turn troubleshooting into a controlled comparison
Retain a reference condition and make each adjustment answer a specific question.
- Preserve the original condition. Identify the batch and discovery stage; retain failed and sound parts before cleaning or touch-up, with traceable records.
- Narrow the scope. Compare material batches, geometry, hanging position, coating batches and rework history to identify common conditions.
- Check records against the clues. Compare actual pretreatment, thickness, part temperature history and intercoat application conditions with product requirements.
- Make interpretable specimens. Arrange comparisons around the suspected issue. Avoid changing many conditions at once; retain original-condition specimens and record every change.
- Verify on actual parts. Check adhesion and relevant assembly, mechanical or environmental performance. Flat panels aid comparison but cannot fully represent cut edges, recesses, welds and stressed locations.
Where prolonged moisture, cleaners or temperature changes matter, retest after agreed exposure conditions. Appearance after baking and a single test cannot answer every service question.
5. Define acceptance methods and conditions
“Passed cross-cut” or “tape does not pull it off” is not a complete report. ASTM D3359’s public guidance explains that the tape test assesses adhesion under defined conditions, does not measure the absolute force needed to break the interface, and cannot finely distinguish high adhesion levels. Technique, tape and environment affect results. [2]
Ratings from different methods, thicknesses or specimen conditions are not interchangeable by name alone. Follow the selected standard and agreement for cut geometry, spacing, tape and evaluation. [2]
Solvent rubs have limits too. ASTM D5402’s public guidance says solvent resistance may develop during chemical cure, but a given level of solvent resistance does not by itself establish full cure. It does not prescribe one solvent, rub count or passing result for every coating. [3]
| Question | Possible check | Report should identify |
|---|---|---|
| Does coating readily separate from the substrate or another coat? | An applicable cut-and-tape method, such as the selected ASTM D3359 method | Standard/version, method, thickness, specimen condition, test location, rating and separation location; procedural details as required by the standard |
| Are the coating’s cure requirements met? | Compare actual part temperature history with the TDS; use a suitable solvent-rub check when appropriate | Product, measurement locations, profile and decision criteria; solvent, rub count and acceptance criteria |
| Does assembly deformation or impact cause cracking/chipping? | Agreed bend, impact or actual assembly verification | Relationship between specimen and part, loading conditions and crack/separation locations |
| Is performance acceptable after moisture, cleaners or other exposure? | Agreed service-related exposure followed by coating and adhesion checks | Exposure, duration, any scribing, recovery conditions and criteria for blistering, corrosion and adhesion |
6. Decide how much rework is needed
Rework must address the failed interface and establish whether remaining coating and substrate are usable. These three situations provide starting points for discussion with the supplier.
Local scratches with sound surrounding coating. Consider local repair only after establishing the damage extent, repair compatibility and acceptability for appearance and service. Verify agreed repair performance; similar color alone is insufficient.
Widespread peeling, continued flaking under light contact or generally poor intercoat bonding. Do not simply cover failed film. Identify which layers need removing, then assess stripping, pretreatment and recoating. Check whether old primer can remain instead of assuming it can.
Corrosion beneath the coating or damage to the substrate. Check how corrosion, stripping and another heat cycle may affect substrate, plating, dimensions and assembly function. Manufacturing and coating parties should agree the route and verify it on samples.
Retain original batch and rework records. Recheck thickness, adhesion, appearance and relevant functions. Whether touch-up or rebaking is feasible depends on the actual system and sample results. [1][3]
7. Describe the problem clearly when buying parts
You do not need every process parameter before starting a discussion. These inputs are more useful than simply requesting “good adhesion and no peeling”:
For example: “This steel enclosure chips mainly around screw holes. No abnormality has yet been found before assembly. We would like to check hole fit and coating condition before deciding whether coating or assembly needs changing.” This states observations and open questions without assigning a cause in advance.
For finish selection, see powder coating, plating and anodizing. For quotation inputs, see the metal-parts surface-finish RFQ guide.
- The part: drawing or photographs, material and sheet thickness if known, expected quantity and rework status.
- Where and when: mark damage locations and whether found after baking, assembly, transport or use; include batch and affected proportion where recorded.
- Service exposure: indoor/outdoor use, moisture, cleaning, rubbing or impact, plus assembly, grounding and mating areas.
- Existing requirements and records: products, primer/topcoat combination, thickness, cure records, test reports and approved samples; mark missing items “to be confirmed.”
- TIGER Coatings — Troubleshooting Guide (01-2022). Powder-coating mechanisms only; not universal liquid-paint parameters. Read pages 5–7, 16–17, 22, 33–34 and glossary.
- ASTM D3359-23 — Rating Adhesion by Tape Test. Public Scope and Significance and Use only; full paid standard not consulted.
- ASTM D5402-19(2024) — Solvent Rubs. Public Scope and Significance and Use only; full paid standard not consulted.
- TIGER Coatings — What Is Powder Coating? Process overview: pretreatment, electrostatic application and cure.